How to Monitor Security Cameras with TP-Link VIGI App?
In an increasingly connected world, security has become a top priority for both homes and businesses. Whether you are protecting your property, managing surveillance for a business, or keeping an eye on important areas, monitoring your security cameras efficiently is crucial. With TP-Link VIGI App, managing your IP cameras and Network Video Recorders (NVRs) has never been easier. This powerful app enables you to view live footage, receive instant alerts, and review recorded videos—all from the convenience of your mobile device.
In this article, we’ll walk you through how to monitor security cameras using the TP-Link VIGI App. We’ll cover everything from setting up the app to exploring key features that will enhance your security monitoring. Whether you’re new to TP-Link VIGI or a seasoned user, this guide will ensure you get the most out of your security system.
What is the TP-Link VIGI App?
The TP-Link VIGI App is a mobile application designed specifically to work with TP-Link VIGI IP cameras and NVRs. With this app, users can manage their video surveillance system, monitor live video feeds, receive motion detection alerts, and review past footage from anywhere at any time. It's compatible with both Android and iOS devices, making it easy to stay connected and secure your property on the go.
Some of the features that make the TP-Link VIGI App stand out include:
Live Video Streaming: Watch real-time video from your cameras directly on your mobile device.
Video Playback: Review recorded footage at any time.
Motion Detection Alerts: Receive instant push notifications when motion is detected in monitored areas.
Cloud Storage Integration: Store footage securely in the cloud for easy access and backup.
User-Friendly Interface: Easily set up and navigate the app, even if you're not tech-savvy.
Now that you have a clear understanding of what the TP-Link VIGI App offers, let's dive into how you can use it to monitor your security cameras.
How to Set Up TP-Link VIGI App for Monitoring Cameras?
Before you can start monitoring your security cameras, you need to download and set up the TP-Link VIGI App. Now visit the Google Play Store or Apple App Store to install TP-Link VIGI App on your Android & iOS devices.
Step 1: Sign Up and Log In
Once you’ve installed the TP-Link VIGI App, the first thing you'll need to do is create an account:
Open the app on your mobile device.
If you don’t have a TP-Link account, tap on Sign Up and enter the required details, such as your email address and password. If you already have an account, simply tap Log In and enter your credentials.
After signing in, you’ll be prompted to set up your security devices.
Step 2: Add Your Devices
To monitor your security cameras, you’ll need to add them to the app:
Add Cameras or NVRs: Tap on the Add Device button in the app. If you’re using a TP-Link VIGI IP camera, you can either scan the camera’s QR code or manually enter the camera’s IP address and credentials. If you have a TP-Link NVR, you’ll need to connect it to the app using the NVR’s IP address or scan the QR code provided.
Follow the Setup Instructions: The app will provide step-by-step guidance to ensure that your devices are correctly connected.
Complete Device Setup: Once your devices are added, you can adjust settings like camera resolution, motion detection zones, and more.
After the devices are added, you’ll be ready to start monitoring your security cameras.
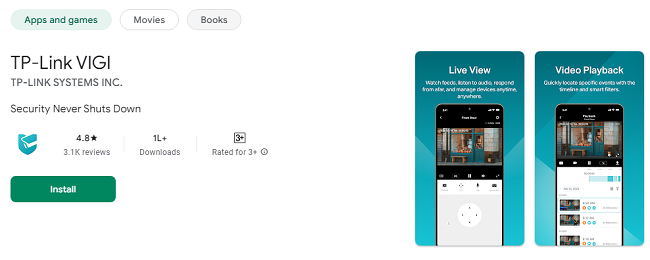
Monitoring Live Video Feeds with the TP-Link VIGI App
One of the most important functions of the TP-Link VIGI App is the ability to monitor live video feeds from your security cameras in real time. Here’s how to do it:
Step 1: Open the Live View Section
Launch the TP-Link VIGI App.
On the main dashboard, tap on Live View to access the live video feed from your cameras.
Step 2: Choose Your Camera
If you have multiple cameras connected to the app, you’ll see a list of all available devices. Tap on the camera you want to monitor.
The live feed from that camera will load immediately, allowing you to see the area it’s monitoring in real time.
Step 3: View the Video Feed
You’ll now be able to see the live video footage directly on your mobile screen.
The video stream will adjust based on your internet connection, ensuring a smooth viewing experience. In case of a weak connection, the app may automatically adjust the video quality to prevent buffering.
Step 4: Zoom and Pan (For PTZ Cameras)
If you're using a PTZ (pan-tilt-zoom) camera, the TP-Link VIGI App allows you to control the camera's movement:
On the live feed screen, you’ll see on-screen controls for zooming in and out, and for moving the camera left, right, up, or down.
Simply tap the on-screen arrows to pan and tilt the camera and use the zoom slider to adjust the camera’s zoom level for a closer view.
Step 5: Split-Screen Mode (Optional)
If you have multiple cameras connected, the app supports split-screen mode for monitoring multiple feeds at once:
Tap the Multi-View button to display multiple cameras on your screen simultaneously.
Each camera feed will be shown in a separate window, allowing you to keep an eye on different areas of your property at the same time.
Receiving Motion Detection Alerts
One of the standout features of the TP-Link VIGI App is its ability to send push notifications when motion is detected. This ensures that you stay informed about any activity on your property, whether you're at home, at work, or on vacation.
Step 1: Enable Motion Detection
Go to Device Settings and tap on Motion Detection.
Enable motion detection for each camera you want to monitor.
Adjust the sensitivity level and set up activity zones—specific areas within the camera’s view where motion should be detected. This helps to avoid false alerts from non-relevant areas.
Step 2: Customize Alerts
In the Notification Settings, you can customize the type of alerts you receive. For example, you can choose to receive alerts for motion in specific zones or during certain times of the day.
Ensure that Push Notifications are enabled so you can receive alerts on your mobile device when motion is detected.
Step 3: Respond to Alerts
When motion is detected, the app will send a push notification directly to your phone. You can:
Tap on the notification to view the live feed from the camera.
Review recorded footage (if the motion event was captured).
Take action if necessary, such as notifying security personnel or reviewing other nearby camera feeds.
Playback: Reviewing Recorded Video Footage
In addition to live video feeds, the TP-Link VIGI App allows you to review recorded footage. This feature is essential when you need to go back and examine past events.
Step 1: Access Playback
Tap on the Playback button in the app.
You’ll be prompted to select the camera from which you want to review footage.
Step 2: Select Date and Time
Choose the specific date and time you want to review.
The app will display a timeline, showing recorded footage for the selected period.
Step 3: Play, Pause, and Fast Forward
Once you’ve selected the footage, you can play it back in real time or use the controls to fast-forward, rewind, or pause the video.
The TP-Link VIGI App allows you to zoom in on specific areas in the video for better detail, which can be helpful when reviewing footage for suspicious activity.
Cloud Storage and Backup
For enhanced security and peace of mind, the TP-Link VIGI App integrates with TP-Link’s VIGI Cloud service. This service allows you to store video footage in the cloud for easy access and backup.
Step 1: Enable Cloud Storage
In the app’s Settings, navigate to the Cloud Storage section.
Enable cloud storage for your cameras, and choose the amount of storage you need based on your recording preferences.
Step 2: Access Cloud Videos
If you have cloud storage enabled, you can access your footage from anywhere, even if your local device is unavailable.
View, download, or share cloud-based footage directly from the app.
Advanced Features for Enhanced Monitoring
Activity Zones and Boundary Alerts
The TP-Link VIGI App allows you to create specific activity zones within the camera’s view, so you only receive motion alerts from important areas.
Define zones where motion detection should be enabled.
You can also set boundary alerts to notify you if something crosses a predefined line within the camera’s field of view.
Custom Schedules
For those who only need to monitor certain areas during specific times, the app allows you to create custom schedules for your cameras. You can set cameras to record or monitor certain areas only during designated hours, saving on storage and alerting you only when necessary.
Conclusion
The TP-Link VIGI App is an incredibly powerful tool for anyone looking to monitor and manage their security cameras from their mobile device. With features like live video streaming, motion detection alerts, cloud storage integration, and video playback, this app provides a comprehensive and user-friendly way to protect your property. Whether you are at home, at work, or on the go, the TP-Link VIGI App ensures you can stay connected to your security system and respond to incidents quickly.
By following the steps outlined in this guide, you can easily set up and maximize the potential of the TP-Link VIGI App. From real-time monitoring to reviewing footage and customizing alerts, this app has everything you need to keep your home or business safe.
Updates